Brother
Network Setup
Chatter communicates with your Brother machine for data collection and file transfer via your network. To enable this communication, you must configure your Brother machine's network settings as outlined here.
Wiring the Network
Connect a network cable to the ethernet port on the inside of your machine's control cabinet, located at the rear of the machine.
If your machine has two Ethernet ports, use the lower of the two ports.
Accessing the Network Settings
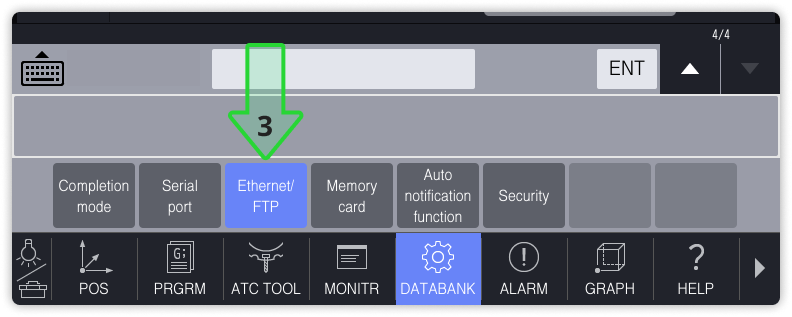
- Press the Databank button to access the machine's settings
- Select 7. Communication Parameter
- Navigate to Ethernet/FTP

Configuring the IP Address
A static IP address is required for Chatter to communicate with the machine. To set a static IP address, disable DHCP and configure the IP address, and subnet mask.

Refer to the Settings Table Reference for a full list of required settings.
Brother machines have a unique way of setting the IP address. You must enter a full 12 digit number, with no periods. For example, and IP address of 192.168.1.24 would be entered as 192168001024.
If you're unsure of your network settings, consult your network administrator or IT department. Many companies have a standard IP address scheme that you should adhere to.
To ensure that the IP address you set does not conflict with other devices on the network, start by pinging the desired IP address from another device on the network. If the ping is not successful, the IP address is available for use.
For more information on pinging, visit our Network Diagnostics Guide.
Enabling Data Collection
To enable remote monitoring and alerts, setting 0209 must be set to 10000. This allows Chatter to communicate with the machine over the local network.
Additionally, configure setting 0004 to No (0) to suppress the communication alert on the machine.
If you are currently using Brother Comm for networked file transfer, please switch to a client such as the Chatter VS Code Plugin or FileZilla, as Brother Comm and Chatter cannot be used simultaneously.
Refer to the Settings Table Reference for a full list of required settings.
Enabling FTP File Transfer
To enable file transfer, set your server user name (setting 218) and password (setting 219), then set the FTP server function (233) to Valid (1). This allows Chatter to transfer files to and from the machine over the network.

Refer to the Settings Table Reference for a full list of required settings.
Saving Your Changes
Once you have configured all your settings, you must apply your changes. To save, press Completion mode and then Save and end

If you want to discard changes, or you're concerned you've made a mistake and want to restart the process, press Cancel w/o saving changes to revert
Test the Connection
In the Chatter web app, navigate to Settings, click the gear icon next to your machine, and go to the Diagnostics tab. You should see your machine listed as online.

Settings Table Reference
Refer to the below table for the proper settings.
| # | Setting Name | Value | Scope |
|---|---|---|---|
| 0202 | Use DHCP | No (0) | IP Address |
| 0203 | IP address | Your IP address (e.g. 192.168.1.51) | IP Address |
| 0204 | Mask bit | 255.255.255.0 | IP Address |
| 0216 | Restrict Ethernet access | No (0) | IP Address |
| 0209 | Port No. | 10000 | Data Collection |
| 0218 | Server user name | MYMACHINENAME | File Transfer |
| 0219 | Password as server | MYPASSWORD | File Transfer |
| 0233 | FTP server function | Valid (1) | File Transfer |
Troubleshooting
If you do not see your machine listed as online, first attempt to restart the Chatterbox by pressing the Power Cycle button on the diagnostics tab. Wait a couple minutes to see if the machine comes online.
Verify the following:
- The machine is powered on and connected to the network.
- IP address, subnet mask, and default gateway are set correctly.
- The IP address of the machine matches what is set in the Chatter web app.
- Setting
0209is set to10000. - Check your router's client list to see if the machine shows up as a connected device.
- Attempt to ping the machine from a computer on the same network. Learn More